5.12.2015

Teacher Gift - Vanilla Extract and Vanilla Bean Sugar


It's that time of year again...teacher gifts.  I wanted to share what I made last year....or was it the year before?  Anyway, this is a classic gift that is handmade.  An important note....the vanilla extract needs a couple of months at least to cure.  So, if you made the extract now, it would be perfect for Christmas.

Things you'll need for the extract and sugar:

  • Vanilla Beans, 40-50 ct. (more about those later)
  • Vodka or Rum.  Needs to be 70-80 proof or more.
  • Sugar (organic, Turbinado, or plain white granulated sugar will do)
  • Pretty jars for the finished project
  • Knife, cutting board and food processor
More about the ingredients:

Vanilla Beans: I usually buy my vanilla beans local, but you can order on Ebay, Amazon, etc.  To make a whole bottle of vanilla extract (we're talking a 1.75L of alcohol), you're going to want about 20 beans or more.  If you're gifting small bottles of extract, you're going to want some extra vanilla beans to put in the individual bottles.  You can order those later.  The sugar takes about 20 beans as well.  To store vanilla beans, wrap them very, very well in plastic to prevent drying. Store in a dark, cool space.

Liquor: I usually use vodka, but my bestie uses dark rum and had great results.  Just make sure that you are hitting that 70+ proof goal.  I do this with a 1.75L size, but I should have purchased more because it didn't leave any extract for me!

Sugar:  Purchase enough sugar to fill your containers.  Any kind of granulated sugar will do.  Turbinado sugar is especially delicious:)  Check your local co-op for specialty sugars.

Jars:  I have had great luck at World Market for jars.  They seem to have every shape and size that I need and they aren't expensive.   I'm sure if you look around at your favorite store.....you can find something that will work.  Heck, even canning jars for the sugar would be pretty. 


Instructions:  Wash your hands and clean your work space.

For Extract:  Get out your vanilla beans and your liquor.  All you have to do is cut the vanilla bean lengthwise from one end to the other.  I then poke around in there a bit to make sure it's split open nicely.  Add it to your liquor.  The whole bean goes in.  Repeat with all beans.  Done.  All you have to do is close up the liquor, put in your pantry and give it a shake about once a week.  Ideally, the liquor and vanilla mixture should sit for about 5 months before gifting/using.

To package prettily:  So, it's been 5 months or more and you're ready to give this gift that is now vanilla extract.  Fill your gift bottles and get out your stash vanilla beans.  Add one or two (split lengthwise) to the bottle.  A pretty ribbon or scrap fabric with a tag will finish it off nicely.  


For Sugar:  Wash your hands and put your hair back.  If you have disposable gloves, wear them...you're giving a gift, not germs.  Dump the correct amount of sugar into your food processor (assuming you have one).  Get the cutting board and cut the vanilla bean lengthwise, just as you did for the extract.  Now, with the flat part of your blade/knife and starting at one end, carefully scrape the inside contents of the vanilla bean and put into the food processor.  Make sure to clean out each bean.  Discard bean husk or add to the vanilla extract!

After you are done with all beans (15-20 beans), close up the processor and pulse the sugar until all of the vanilla has been distributed evenly and is well incorporated into the sugar.  All you have to do now is pour into the jars and finish with a ribbon and tag.  

Of course, no teach gift is complete without a heartfelt card from their student.  Teachers hold a very special place in my heart.  They work so very hard every day to make sure your child succeeds.  Here are some other fantastic teacher gift ideas:
  • Annuals or small perennials, decorated with a bow.  Make sure the plant has growing instructions included.
  • Handmade bowl covers and hot pads
  • Gift Certificate to a book store or a craft store
  • Handmade bird feeder.  This would be a great daddy project with help from the student.
  • A pretty decorative pillow with ruffles is great for a young teacher.  Keep it neutral!
  • Zippered, padded iPad cover.  I need to get that tutorial up here!
Some of these ideas require sewing skills, but try to keep in mind that any thoughtful gift is more than the teacher is expecting.  Even if it is just a card from the student, that is enough.  Your time, attention and understanding are the best gifts of all.

Happy end of the school year to all!
Jayna


4.23.2015

Product Review: Dryer Balls

While browsing one day, I came across some Laura Ashley dryer balls in Marshall's.  I was intrigued to say the least!!  The package claimed several things, one of which was very, very dear to my heart: no chemicals.  They are meant to replace dryer sheets and softeners.

I have a daughter (and myself) who has reactions to many things in her environment.  She was diagnosed young with eczema, but I came to realize that wasn't the case.  Her symptoms would come and go, sometimes very severe.  I soon realized that she had skin allergies.  Anyway....the dryer balls aren't coated with any chemicals, softeners, fragrances, etc.  They're just hard plastic balls.


So, I'm standing in Marshall's, wondering how these plastic balls are going to help me save money, energy and best of all, give me a life with a few less chemicals in it.  The package says that the balls bounce around and separate your laundry while in the dryer, making it more efficient.

I've used them for about 4 months now and I'm very pleased.  My daughter itches much less now and that makes me a happy mama.  At first I noticed a bit of static on some items, but that seems to have resolved itself.  I honestly couldn't be happier that I tried this product!

There are lots of different versions of the balls, many of which are wool.  You can even add essential oils to them if that's something you want to do.  Here is a great tutorial on the Live Simply blog that shows you step by step instructions on how to create these wonderful, colorful balls.

I know there are moms out there that are struggling with eczema or allergies in their families.  I'm here to tell you this is one step closer to your goal.

Happy Spring!
Jayna

4.22.2015

Changing Pad Cover Tutorial


A changing pad cover is a simple item to make, requiring beginner sewing skills.  This tutorial assumes you know to back stitch at the beginning to secure stitches, etc.  Here is my tutorial on how to create a changing pad cover.  I recommend you read the whole tutorial first.

Not feeling so creative?  I also make and sell custom crib bedding.

Items you'll need:

- 3/4 yard quilting cotton (44" wide)
- 1 yard or less of 5/8 wide braided elastic, white
- Thread
- Basic sewing skills, serger is a bonus!

We will start with our fabric.  When starting any project, it is wise to wash and dry your fabric so there aren't any surprises. I never use heat when washing/drying my fabrics so as to minimize shrinkage.  Press fabric with selvages together, how it came off of the bolt.  Fold the fabric with selvages together and then bring the folded side up to the selvages, lining everything up on your cutting mat to make sure we have square edges. Trim excess.  This is called squaring up your fabric.  Do this with all sewing projects!

Once you have your fabric squared up, cut your fabric to 44"x29".  The fabric should already be 44" wide, so you just need to cut to 29" to get the piece you need to make the pad cover.  From there, take all 4 corners and put them all together, lining them up perfectly.
Once all 4 corners are lined up, cut a 5"x5" square .  Unfolded, it looks like this:


Now we will make the pockets of the pad cover.  Take only one corner cut-out and fold the two "points" together, right sides together.


When you do this, you'll have the two cut edges line up.  Pin this together.  This will form your pocket.  I always serge this edge and then straight stitch for durability.  If you don't have a serger, that's okay!!  Just straight stitch that edge with about a .25" seam allowance.  You can then either zig zag the edge or some machines come with a "serge stitch".  Repeat for all 3 remaining corners.  Trim the excess threads as you go.  

Next step is to finish the edges of the fabric.  I serge around the whole perimeter of the fabric, which is now in oval shape.  Again, if you don't have a serger, simply zig zag the edge or use your machine's serge stitch to finish.  

Now it's time to add the elastic.  I use a zig zag stitch, which allows the elastic to stretch.  You'll also need to lower the stitch width, which is usually signified with a zig zag picture on your machine.  On my machine, I lower mine to 3.5.  I also stitch the elastic to the fabric, I don't create a channel where you feed the elastic around.  It's my preference.  Make sure your thread color somewhat matches your fabric color. 


With wrong side of the fabric laying up on your machine, fold over the edge only once, and only enough to get your stitching on the top side.  Place the end of your elastic so it covers the stitching on the fabric. See pictures below.  The idea is to enclose the stitched edge of the fabric under your elastic so you don't see it.  With your elastic in place, stitch and backstitch over the first half inch or so, to secure.  If you have a "needle down" feature on your machine, set that for needle down.  

You are going to gently stretch the elastic as you zig zag on top of it.  You might have to give some gentle pulling contrast on the fabric that has been sewn in back of your machine, but you don't want to pull the fabric through, you're just giving some reinforcement to it.  Fold the edge of the fabric over and stretch that elastic and stitch.  Make sure the width of your zig zag is not wider than your elastic as you want to stitch ON the elastic to secure it.  

Stretch and zig zag the elastic on all the way around the perimeter of the pad.  When you get around to the beginning of your elastic, just back stitch a few times and cut the elastic off.  Now is the time to look for threads that need trimming, etc.  That's it!!  Now you have a gorgeous, custom made changing pad cover!  Not feeling so creative?  You're in luck, I also make and sell custom crib bedding and other home decor items.  Hop on over to my shop to contact me about your custom items!


Happy Sewing!
Jayna


2.19.2015

Modern String Art


This is totally a 4th grade project.  AND, it looks fabulous on my wall.  String art.  Not only does it add color, but it ads texture, which adds interest.  You could do a heart, a letter, a bird, a tree...whatever your little heart desires.

Materials needed:

- Hammer
- String (usually found in the yarn section at your local crafty store, or perhaps on your hubby's workbench:)
- Wooden plank, etc.  I got mine at Hobby Lobby, in the unfinished wood section.
- Paint (optional) You can paint your wood thing or decoupage, etc.
- Nails.  I use 1" finishing nails
- Paper template
- Tape
- About 1 hour of time without kids, but you can add wine or beer.

Nails and String and Template


1.  If you want to paint or decoupage your wood plank, now
would be the time.  Please allow enough time to dry well.  Before painting, look on the back to make sure there's a way to hang the finished project.  If not, you'll have to make that happen.  Now...paint.

2.  Cut out a template.  I chose a heart as this was going on my living room wall as a part of my new gallery wall.  Using a scrap piece of paper, trace and cut out object.  It has to be an object that without definition, will still look like that object.  A letter is perfect, or a shape.  Something like an airplane might not work so well as it needs more definition to not look like a blob.  I

3.  Center the template on your wood and secure with tape (under template).  It's okay if you don't want to measure. I didn't.

4.  Hammer nails into wood surrounding template.  They don't need to be in super far, just stable.

5.  Take your string and tie one end on a nail, leaving about 5" of tail for tying off later.

6.  This is where the fun begins!  You can take your template off now.  Start by making an outline 2 times around the perimeter of the object.  Each time you come to a nail, wrap the string around it and go to the next.  It is VERY important that the outline is done a special way.  When moving from one nail to the next, always wrap the nail in a clockwise motion.  This forms a very neat line.  Keep your string taught as you wrap the entire time.

7.  Now you can move onto randomly wrapping the nails.  Sometimes I wrap twice on each nail.  Move around and fill up your space!  Occasionally, you'll have to push some of the string down the nails so you have room to keep wrapping.

8.  How do you know when to stop?  You stop when you like how it looks.  It's all up to you.  Finish up by tying it off at the starting point.  Done!!!  Sit back and admire your craftiness!!


There are lots of ways you can make this your own with colors and design.  Have fun!!

~Jayna

2.18.2015

Peaches & Butterflies


You can't get too far into a boutique these days without the soothing images of corals, peaches, mint and aqua.  I have personally fallen head over heels for the combo.  Adding metallic gold to the mix is like adding a cherry to an already gorgeous sundae.

This is the Winged Collection from Art Gallery Fabrics.  Fabric designer Bonnie Christine includes this collection in her stunningly vast array of fabric creations.  I'm not quite sure how a pastel can be bright and soothing at the same time, but she's done it here.


Thank you to my wonderful customer who sent me a few pictures of her bedding made with these gorgeous fabrics.  Bedding made by RockyTop Design.  Custom made children's bedding and other home decor pieces.

Flutter away, butterfly!

-Jayna

2.17.2015

Coffee Table turned TV Stand


I haven't painted many pieces of furniture, but I'm always so pleased with the results.  We bought a new TV and therefore, needed a new TV stand.  I couldn't bring myself to buy something new, so I went in search of something that would work from Craigslist.  Found it.  Gorgeous and in perfect condition, this coffee table was to be the new TV stand.

Fresh off of Craigslist

I started with spray primer.  After doing some research, I decided to use the Kilz brand spray primer.  I did a bit of light sanding first, then I wiped clean with water.  After drying, I used the spray primer on it, until it was almost white.

Primer added


After drying overnight, the next morning I bought an antique white spray paint.  I almost used a roller and paint, but I just didn't have it in me to get all of that out.  Rustoleum was the winning brand here. Nice, light, even sweeps when spraying.  I put some fans on it and let it dry for another 5 hours before I went over it with a 2nd coat of the antique white color.  Paint takes longer to dry when it's cold.  After the second coat, I allowed it to dry overnight.

The top of the TV stand is where I was torn.  I thought about painting the whole thing antique white and then distressing.  I also thought about using a bright turquoise for the top.  I had that spray paint already but I couldn't figure out how to cover the rest of the table well enough to use spray paint on the top only.  I seriously didn't have time to waste on that.  I finally reached into my extensive collection of paint in a can and found the perfect shade of light, celery green.

I used a brush and it worked great.  I had my mind set on distressing after drying, but I just loved the look of the table without it.  I'm not into the whole 'shabby chic' look anyway, so I went for the 'brand new' look.  Hot damn.  This table turned out gorgeous.

Paint Finished!

I always like to finish up with a thin coat of Polycrylic.  You can get that in the wood stain section in the hardware store.  It adds a bit of sheen, but mostly just protects it from fingerprints and scuffs, etc.

I finished it off with a new gallery wall.  I scored gray/silver baskets at TJ Maxx.  Love it.


My advice, don't be afraid of trying this.  Always make sure to let the paint dry well in between coats and keep away from flying dust, etc.  You've got this!!


-Jayna

2.16.2015

Metallic Pillows

I just had to quickly share these wonderful coral, aqua and metallic gold pillows I found the other day. Target. That's right, I found them at Target.

 Loving these geometric shapes and soft metal prints. Anyway, thought I would share. Soon to be on sale, I'm sure:)

Have a great day!
Jayna


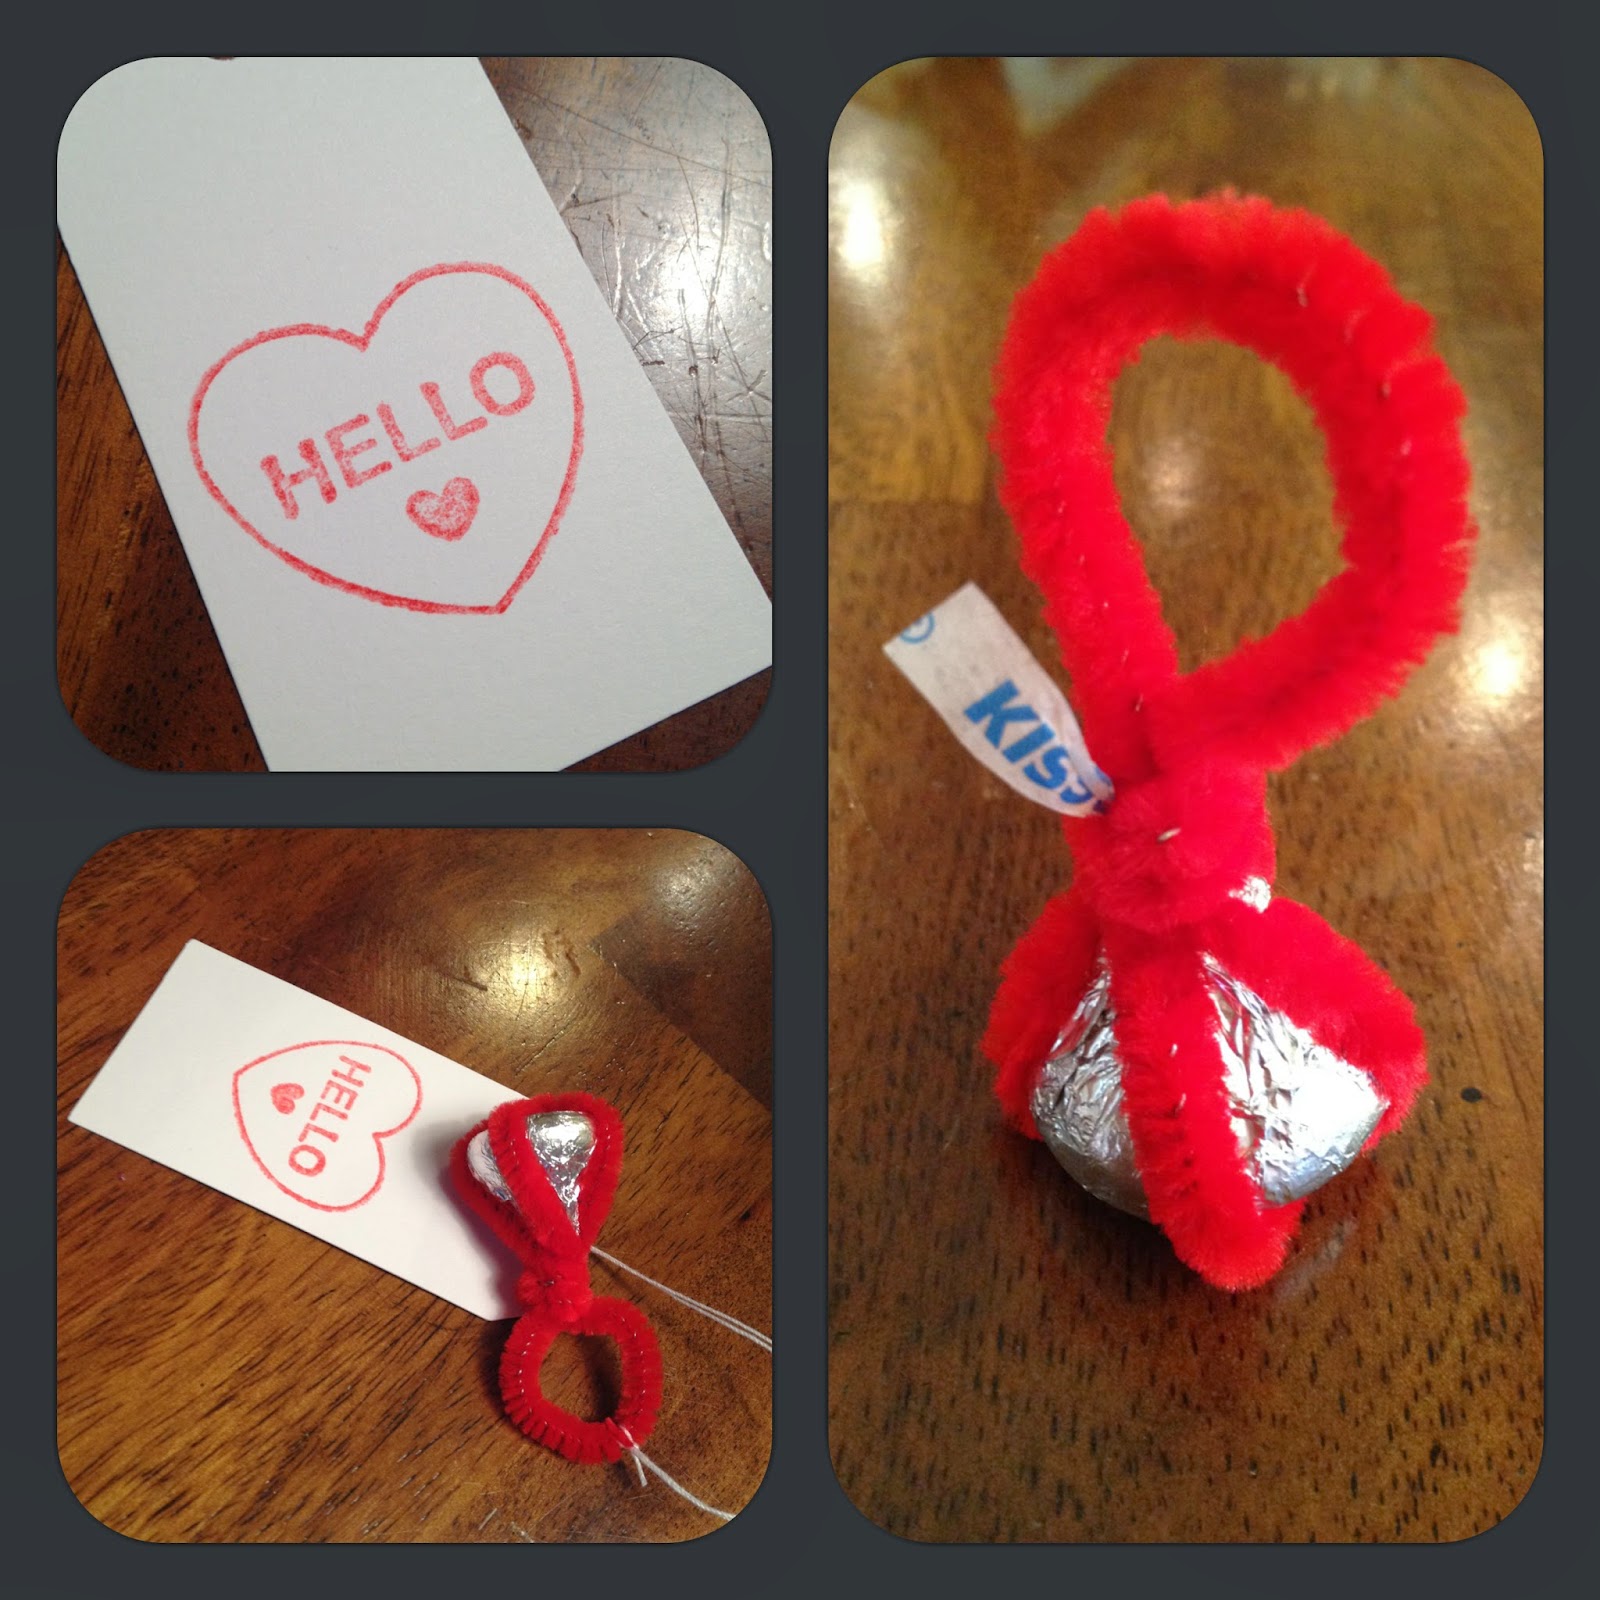
Valentine Ring Bling


Every year, my quest is to find a Valentine project that is simple and affordable.  I have 3 children in school now, so even a simple Valentine adds up when multiplied by 75! Enter, the chocolate ring bling.  Simple and very affordable. Perfect for our busy household.

Supplies:

Bag of Hershey Kisses (one kiss per Valentine)
Bag of Red pipe cleaners (one pipe cleaner per Valentine)
String or yarn of some kind
Tags (I purchased pre-cut tags in the scrapbook section, but you can cut your own)
Pen (I used a pretty paint pen that I already owned)


  1. Take out one pipe cleaner and cross the two ends, as shown below. Give one or two twists.
  2. Place the Kiss flat side down on top of the twisted part.

3.  This is where I pic up both pieces and make sure the crossed part of the pipe cleaner is centered on the kiss.  Now bring all 4 pieces up and holding securely at the tip of the Kiss, twist.  I do this a few times and then wind around the sharp ends that remain.  Try to get those hidden as they can be sharp.  Put the ring on your finger to shape.  If it needs to be smaller, a few more twists will work.

4.  I purchased a stamp for the tags, but you don’t have to, or can add a sticker or some other prettiness.  Then, tie the tag onto the ring, fill out the To and From and you’re done!


After you've tied some string onto the tag and then onto the ring, special care should be given to these so they don’t tangle.


Great for teachers and children alike.  Happy Valentine’s Day!!

Jayna