
My goal is to start sharing with you my crafts that I do (on occasion) that you can do at home as well!
My first is the adorable button monogram. I chose to do it on a backing of scrap fabric, but you can use a pretty piece of scrapbook paper, construction paper or you can even do it on a piece of wood covered with fabric...the list goes on and on.
I went to the thrifty (aka the thrift store for those who have never called it the thrifty) and looked through their used frames. You'll find some great frames for super cheap and even less expensive are the frames with no glass. Perfect for this craft.
I started off with an inspiration from this blog.
Things you need/I used:
paper
printer
fabric
frame
buttons
hot glue gun/hot glue
pins
For the fabric background, pick a fabric that isn't too busy. Solids are great or something like I chose (eyelet) is great because it uses a solid color but it has a design element because of the texture. Something like matelasse or pique would do nicely.
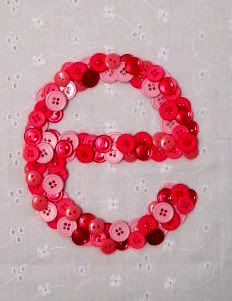
I took a printout of a lowercase "e" sized nicely for an 8"x10" opening and pinned it underneath my fabric. If you are using fabric, make sure you are taking into account that you will need to overlap the fabric behind the frame backing. Because I was using a white fabric, the letter shown through nicely. If you can't see through your fabric, I would suggest cutting out the letter and tracing around it with a pencil or even a pen. For those using card stock or other paper, you can print your letter right on that.
Heat up those glue guns! I haven't talked about glue guns much before, but make sure you have a low-temp glue gun. Those high-temp guns will result in 2nd degree burns for sure--ouch!
I used a package of buttons that I bought at JoAnn Fabrics. Of course, you can use assorted buttons that you have collected over the years or were lucky enough to score at that last estate sale.
I started by taking the larger buttons and placing a small amount of glue on the back and placing them within the boundaries of your letter. It's important not to stray over the lines! Also, don't use too much glue as it will seep out from under your button creating unsightly glue bubbles that aren't easily removed. Don't worry about the glue spider webs, those are easily remedied at the end with a blow dryer;)
I should have taken pictures of this whole process, but I didn't. Thank goodness for my BFF, Sarah. We did the craft together and she took pics.
After you've staggered the larger buttons and filled up as much space as possible, you can start filling in the empty spaces with the smaller buttons. It's important to really try to not cross over the lines. I took some of the smallest buttons to see if I could squeeze them into the space on the first layer. Then, I started working with color and size to create 2-3 layers of buttons throughout the design. Just go with what you think looks good. As long as you're staying within the lines, you can't mess this up. Don't be afraid to use cute shapes like butterflies or airplanes. Go with your creative instinct!
You'll know you're done when you look at it and you smile. I unpinned the paper from underneath, and framed this gorgeous creation. It's going to go perfect in my little girls room.
Have fun!!
Cheers,
Jayna


